

On This Page
How To Vacuum a Pool With an Automatic Pool Cleaner: A Foolproof Guide
Firstly, every pool owner should own the following items to make pool maintenance easier. While not every item is needed in every case, having them will come in handy.
- Vacuum Plate – The vacuum plate goes in your skimmer above the basket and enables pool cleaners and vacuum hoses to use the power of your pump to suck up debris. Each pool is different and there are many different types of vacuum plates make sure you have the one suited to your pool. Some pools have two skimmers which might require two vacuum plates. In this instance, you might need a plug to block one off, while cleaning the pool.
- Telescopic Pole – This enables you to scoop out debris, brush the pool, and manually vacuum the pool when needed.
- Brush – A brush helps clean the walls and floor of the pool, removing stubborn marks, algae or debris.
- Scoop – This allows you to remove debris from the pool. There are 3 types of scoops. See (article: Pool Leaf Removal) for the right one for you.
- Vacuum Head – this is a key part of manually cleaning the pool. It attaches to your Telescopic pole and vacuum hose, enabling you to vacuum the pool. There are two main types of vacuum heads. Flexi head is best suited for concreate/tilted pools and works with Fiberglass pools. It uses 38mm vacuum hoses. The Vinyl Vacuum head is bested suited to Vinyl pools and fiberglass pools. It has a tapered connector that can support 32mm & 38mm hoses.
- Vacuum Hose – The vacuum hose is a continuous piece and connects the vacuum head to the vacuum plate. When the pump is on, debris is sucked up through the vacuum head, into the hose, and finally into the skimmer basket.
Using Manual Equipment?
If you don’t have an automatic pool cleaner or want to clean the pool yourself follow these steps:
- Firstly, gather your Telescopic pole, vacuum plate, vacuum hose, and vacuum head.
- Attach your vacuum head to the end of the telescopic pole. The Wishbone inside the telescopic pole, will lock the vacuum head in place.
- Take one end of the Vacuum hose and firmly push the cuff onto the vacuum head.
- Place both the Pole and vacuum head, with hose attached, in the pool (near the deep end)
- Now slowly Push the Vacuum hose down into the water, the goal here is to get all the air out of the hose.
- Alternatively, you can turn on the pool pump, Grab the other end of the vacuum hose that’s not attached to the vacuum head and place it over a return jet. This will push water through the hose and get all the air out.
Note: if you are vacuuming to waste this is not the best idea as it will disturb the dirt and grime on the floor making your job a little harder.
- Alternatively, you can turn on the pool pump, Grab the other end of the vacuum hose that’s not attached to the vacuum head and place it over a return jet. This will push water through the hose and get all the air out.
- To connect the hose to the pump we need to put the Vacuum plate into the skimmer above the skimmer basket. Once the vacuum plate is firmly in place simply push the hose into the hole in the skimmer plate. Now you are ready to Vacuum the pool manually.
Remember it is not a race, slow and steady will yield the best results. Rushing will push up debris making it harder to vacuum in the long run. Remember to overlap each stroke so that you don’t miss any dirt or debris.
If all that seems too hard or time consuming, Hyclor has a range of Automatic pool cleaners which can automate this task to a large extent.

How to setup HY-CLOR Automatic Pool Cleaners
Every Pool Cleaner is a little different in terms of set up, but they all follow these main steps.
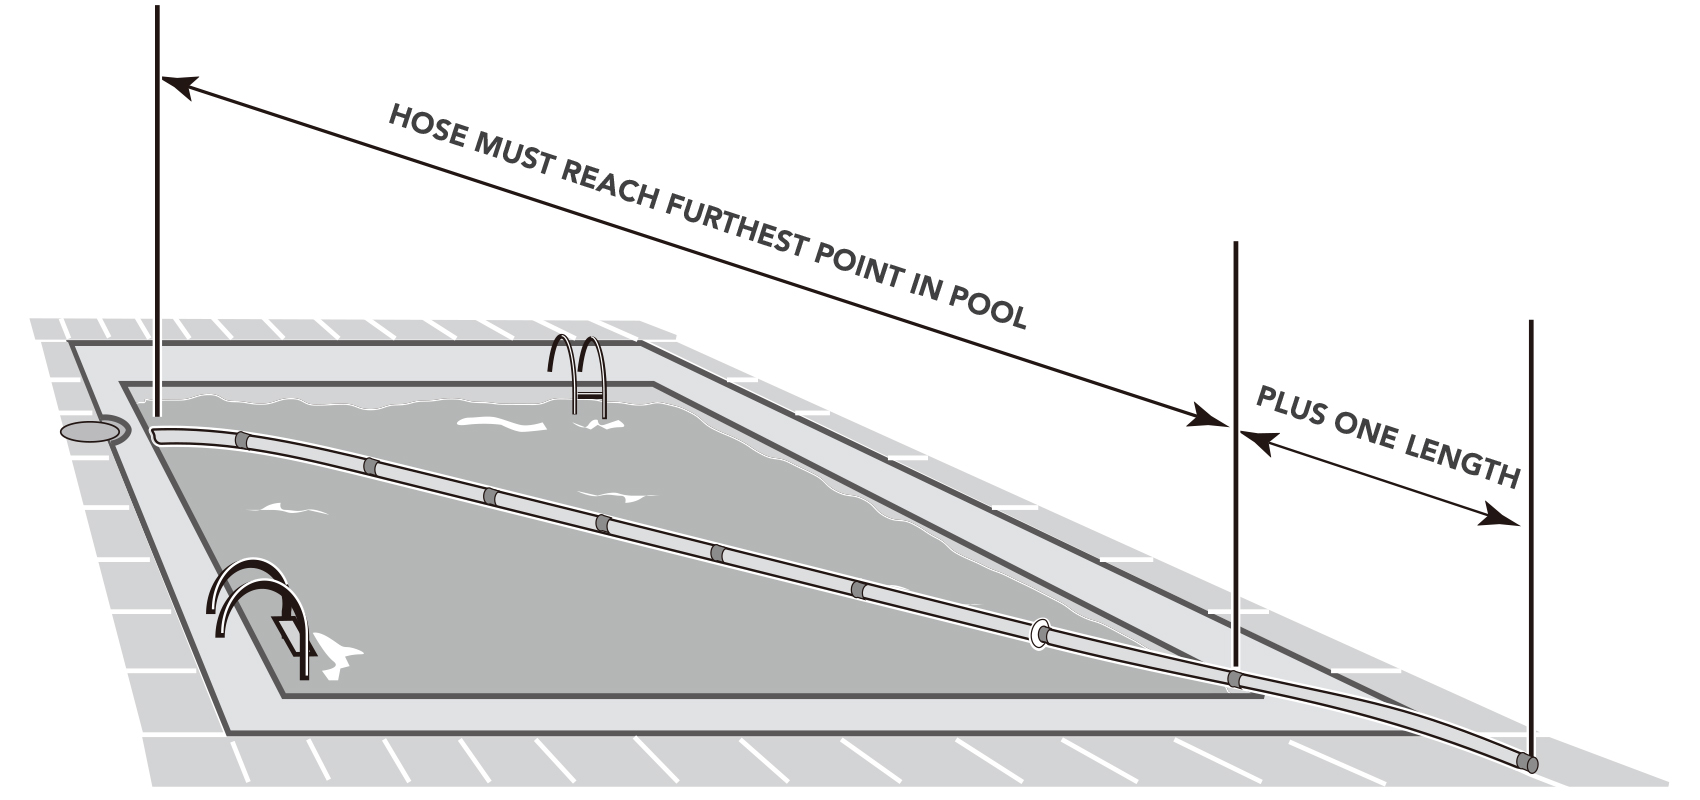
- Measure your pool from the skimmer box to the furthest point in the pool.
- Lay out that much hose length, plus one segment (1m).
- For example, my pool from the skimmer to the furthest point is 6 meters. I would lay out 7 meters of hose.
- For example, my pool from the skimmer to the furthest point is 6 meters. I would lay out 7 meters of hose.
- Most of HY-CLOR cleaners come with a Female-to-Female hose. If this hose is included, use it as the last hose to connect into the skimmer box via the flow regulator.
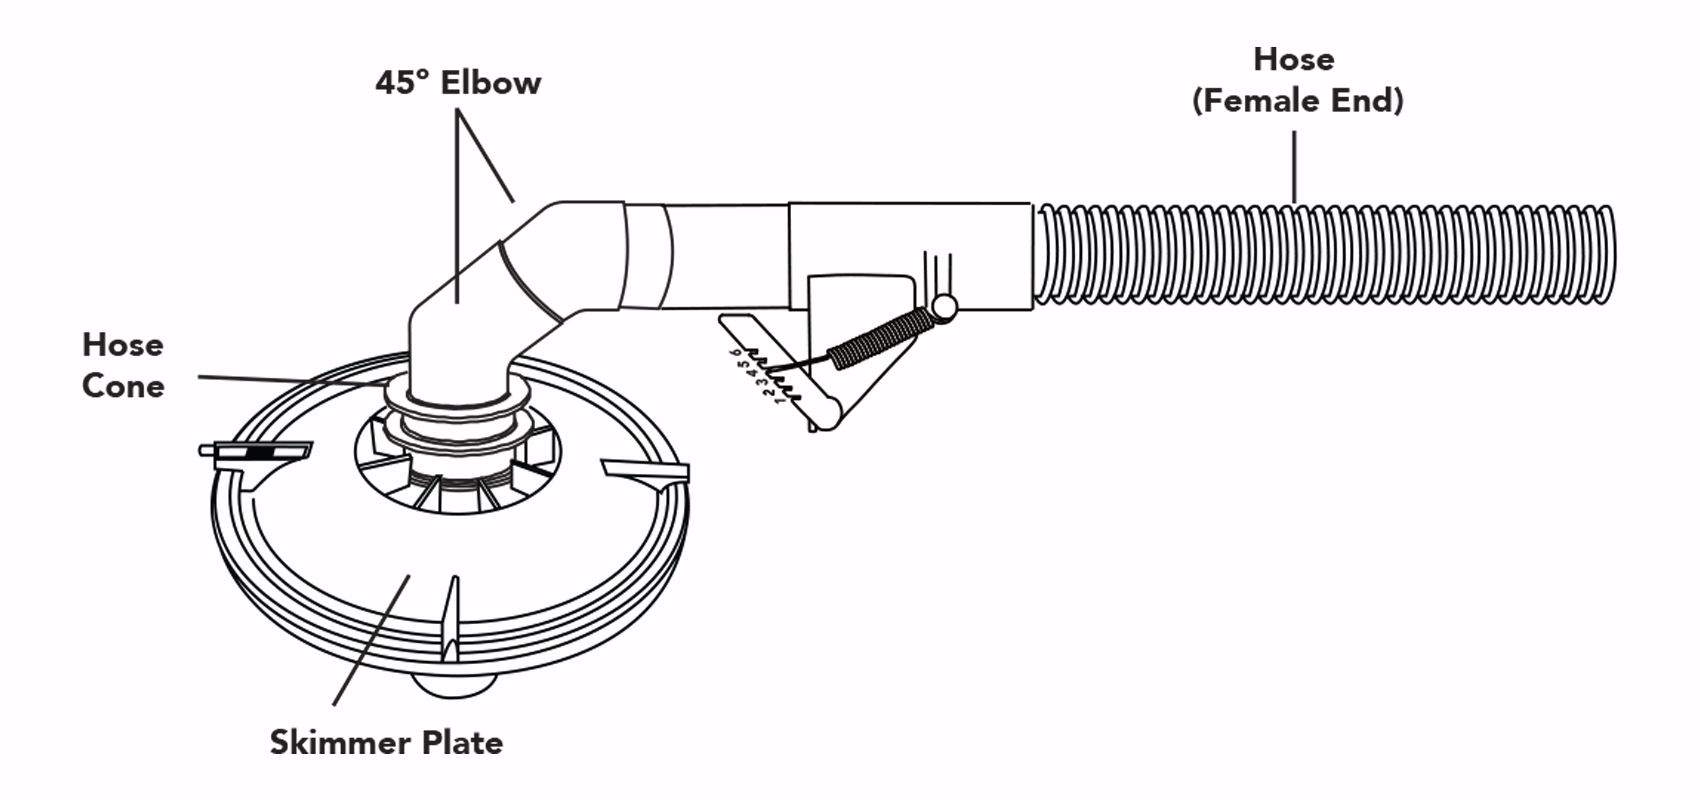
- The skimmer box set up is the same across all cleaners.
- Firstly, push one 45-degree elbow into the second elbow so it makes a 90 degree bend.
- Push the Hose cone into the vacuum plate, it is tapered so it will seal tightly.
- Now push the combined 90-degree elbow into the hose cone.
- The flow regulator pushes into the open end of the 90-degree elbow
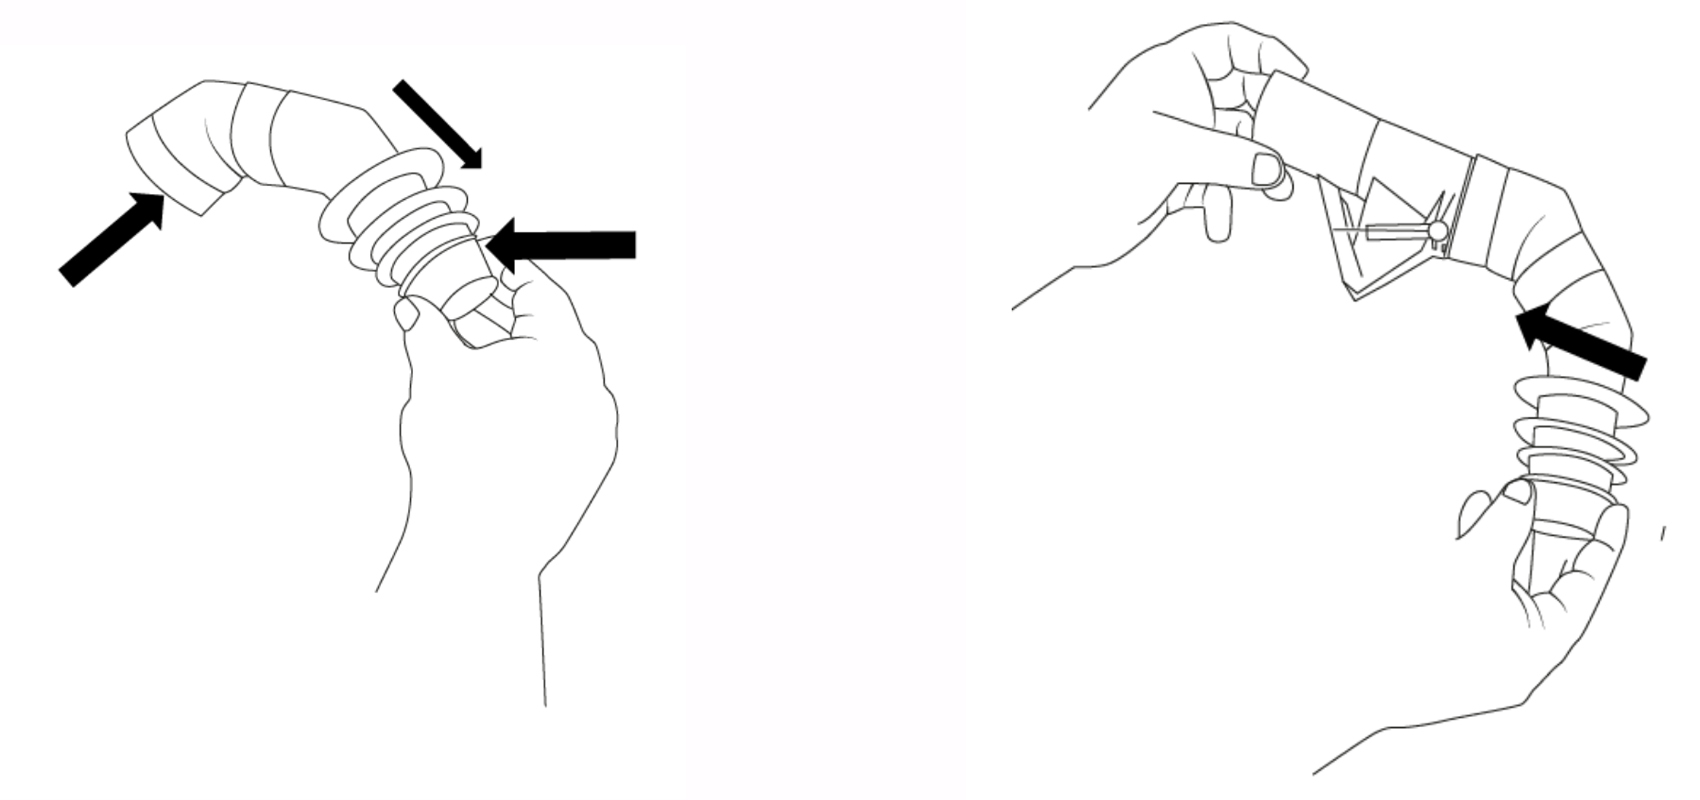
- Note: the arrow on the flow regulator should be pointing away from the elbows towards the pool (except for the pulse cleaner)
The final assembly should look like the below image.
HY-CLOR PULSE AUTOMATIC POOL CLEANER
The Pulse pool cleaner requires a few additional steps from those outlined above. For a more comprehensive guide, refer to the Pulse pool cleaner manual available on the Hy-Clor website.
A notable distinction between the general pool cleaner instructions and the Pulse cleaner is that the arrow on the flow regulator should face the elbows rather than the pool.
- Attach the skirt to the bottom of the cleaner above the foot, ensuring that the side with “TOP” printed on it faces upwards. A correct attachment allows the skirt to twist and turn freely with minimal friction and sits just above the Foot of the cleaner.
- Clip the deflector wheel into the rotating swivel along the body of the cleaner. Apply firm pressure until it locks into place and ensure that the float is facing upwards.
- Now Clip the rear bumper strap into place. There are two slots that it needs to fit into. One at the top of the device and the second at the bottom on the opposite side of the float. The three weighted ‘balls’ should be situated towards the bottom; the strap does not pass through the deflector wheel but under it. Ensure a firm click to secure it in place.
- Place one weight for the Pulse cleaner approximately 1 meter from the unit or at the end of the first segment joining the second away from the cleaner. The second weight is typically used to balance out the hose.
- Lastly before connecting all the segmented hoses to the cleaner, put one hose adaptor on the end of the cleaner so the female end of the universal hose will slide tightly over it.
- Now remove all the air from the cleaner by slowly submerging the hose or using the return jet trick.
- Firmly secure the vacuum plate above the skimmer basket and turn on the pool pump. The pulse will happily Pulse away making a hammering sound.
If the cleaner moves too fast and becomes significantly loud, adjust the regulator valve by moving both springs lower until the cleaner moves at an optimal speed.
Keep in mind that the cleaner doesn’t need to rush; it will be in the pool working for up to 8 hours daily, gradually cleaning over that period.
")

HY-CLOR SWIFT AUTOMATIC POOL CLEANER
The Swift pool cleaner requires these specific steps in addition to those outlined above. For a more comprehensive guide, refer to the Swift pool cleaner manual available on the Hy-Clor website.
The swift pool cleaner comes with some parts that need to be attached beforehand.
- Stretch the Skirt over the Footpad, fins pointing away from the pool towards the cleaner. Ensure the inside rim of the Skirt aligns with the track around the Footpad. Once positioned correctly, the Skirt should rotate smoothly around the Footpad.
- For tight corners and/or ladders in your pool, use the Deflector Wheel to guide the SWIFT pool cleaner. To install, push it over the Hand nut until it clicks and rotates freely.
- Now for the weights, these need to be installed approximately 1 meter from the unit or at the end of the first segment joining the second away from the cleaner. The second weight is typically used to balance out the hose.
- Once you have measured out enough hose to the furthest point save the last segment towards the skimmer box for the Female-to-Female hose, this special hose is designed to connect to the flow valve (arow pointing towards it) and the male end of the rest of the segmented hoses.
- Now connect the Swift to the skimmer box using the method in How to setup HY-CLOR Automatic Pool Cleaners and turn on the pool pump to enjoy a clean pool.
Notes: The swift cleaner uses a diaphragm, so it is prone to wear and tear. Reducing the flow through the cleaner (using the flow control valve) slows the cleaner down and reduces wear. A small reduction in speed can result in a substantial increase in the life of the Diaphragm.
Keep in mind that the cleaner doesn’t need to rush; it will be in the pool working for up to 8 hours daily, gradually cleaning over that period.
HY-CLOR GLIDE TWO WHEEL POOL CLEANER
The Hy-Clor Glide pool cleaner is very different to the other suction cleaners. It is powered by a turbine, effortlessly manoeuvres out of tight spots and operates in total silence. The unit arrives fully assembled and only requires hose attachment and connection to the skimmer plate. Consult the manual for details.
-
- Connect the small leader hose to the top of the Glide’s swivel.
Position the first hose weight approximately 30cm from the unit, near the end of the leader hose.
Follow the hose attachment instructions from “How to Setup HY-CLOR Automatic Pool Cleaners”, keeping in mind that Glide segments are 800mm long. Save the female-to-female segment for connection to the skimmer box flow regulator valve.
- Place the second weight between 50-60cm from the cleaner on the second segment, with the option to reposition within 30cm to 1.5m for improved pool navigation.
- Use the included Flow Gauge to verify suction, aiming for a 5-6 rating for reliable wall climbing. Attach the Flow Gauge to the leader hose connected to the cleaner, near the cleaner head, for an accurate representation of real-world flow. This does not stay on the cleaner and is used only for setup/maintenance.
- Before targeting walls, ensure the Glide Cleaner functions effectively along the pool floor. Set the wheels to turn between 11-14 RPM for optimal performance, as a slower rate may pose challenges around corners and steps.
If the cleaner moves too fast and becomes significantly loud, adjust the regulator valve by moving both springs lower until the cleaner moves at an optimal speed.
Keep in mind that the cleaner doesn’t need to rush; it will be in the pool working for up to 8 hours daily, gradually cleaning over that period.
")
Interested in Automatic Pool Cleaners and Supplies?
If you’re scratching your head, wondering how to vacuum a pool with an automatic pool cleaner, remember these key steps: Nail the set-up, let the cleaner fully submerge and settle to the bottom of your pool before working its magic, then correctly rinse, dry, and store it.
Once you’ve aced these steps, reward yourself by taking a plunge in your sparkling clean pool!
For all your automatic pool cleaner and other pool product inquiries, don’t hesitate to contact the professionals here at Hy-Clor. We can assist you in finding the perfect solutions for all your pool maintenance needs.
Fill in the online form, or visit your nearest Bunnings Warehouse for our full range of products.